Termites
Termite Inspections
- Pull up to apartment complex, park by rental office. Do not park in future resident parking
- Open Pest Pac, press time in
- Walk into leasing office, Greet the leasing agent, pick up pest control list with all keys needed. Go over any special notes the manager may have regarding service. ‘Hi, my name is _____ with Environmental Pest Management I’m here today to do your pest control. Do you have a list for me? Ask for property map if you are not familiar with property
- Go to unit, knock on the door 3 times. If tenant answers the door we introduce ourselves (I’m “your name” with Environmental Pest Management) Once tenant allows us in we then can ask probing questions about pest related issue; Where have you seen activity? About how long have you noticed pest issue? ETC. We do NOT discuss potential treatment plan with tenant. We do NOT discuss other units, unrelated or ongoing issues with the tenant
- After knocking 3 times if no one comes to answer the door, we then use key to open the door and announce yourself (I’m “your name” with Environmental Pest Management) Check to see if animals are present, if so make sure they are properly secure in cage. If animals are loose in unit we cannot enter
- Place booties on if necessary
- Begin inspection. During inspection we are looking for mud tubing, dead or alive swarmer’s, moisture issues & any visible wood damage. For multifamily units “Apartment style” our inspection should focus on exterior walls, window frames in living room, & bedroom. If tenant has suggested they have seen activity in other areas we should also inspect those as well. For townhome units with basement our inspection should focus on basement area sill plate, behind insulation if needed, exterior walls in living room & bedrooms. Same type of inspection goes for any condo/duplex units with basement. For townhome or condo units with accessible crawl spaces we will also need to inspect around the sill plate as well. Townhome or condo units with a garage, we will also need to inspect interior perimeter of garage. If any signs of termite activity is found we then label as positive & move to next step. If no signs of termite activity is found or if a different pest is found other than termites, such as ant swarmer’s we then report back to leasing office, & get further instructions such as treating unit for other pest.
- If termite inspection is positive we then take pictures of any activity. Pictures will need to be taken of swarmer’s, mud tubing, moisture issues & or wood damage. Also take a picture of front door unit number to document. When tenant is not home during service we need to leave a door hanger on backside of front door with our name, time of service & what work we did in unit. If inspection is positive we do NOT schedule any treatments with tenant.
- After pictures are taken of activity we then move to measuring the exterior of structure with our measuring wheel. For any one of these building structures we always measure the entire exterior structure. While measuring the structure we also will need to graph out image of structure with proper measurement numbers for each side of building. When we measure the buildings we start at one end, measure all the way down to other end of building. While measuring we need to keep wheel as close & straight against the structure as possible. If any stoops or other landscape structures are against the building such as front stoops, porches or patios, we also need to depict that in our graph. We need to measure front side of building, backside, & both sides
- Once measurement is complete, we then take a picture of our graph, send it in email with all other pictures of termite activity to EPM Office manager & General manger. This is very important so that our office can then properly put a bid together for treatment of buildingAfter measurement, return keys to rental office, give the manager any notes from the service. For positive termite inspections let leasing agent know our office will contact with a bid for treatment of unit & building
- Return to truck, complete Pest Pac and Work Order System. Always placing any pictures you may have taken into Work Order System.
- Press completed service in Pest Pac, head to next stop on schedule
Sentricon Installation SOP
- Pull up to Properties rental office
- Let the rental office know you are there for the Sentricon treatment and get keys if you need to go into the unit for a spot treatment
- Take pictures of the front, back, and sides of the structure you are treating
- Make a drawing of the structure
- Measure the structure of the building with a measuring wheel and mark North, South, East, and West on the drawing
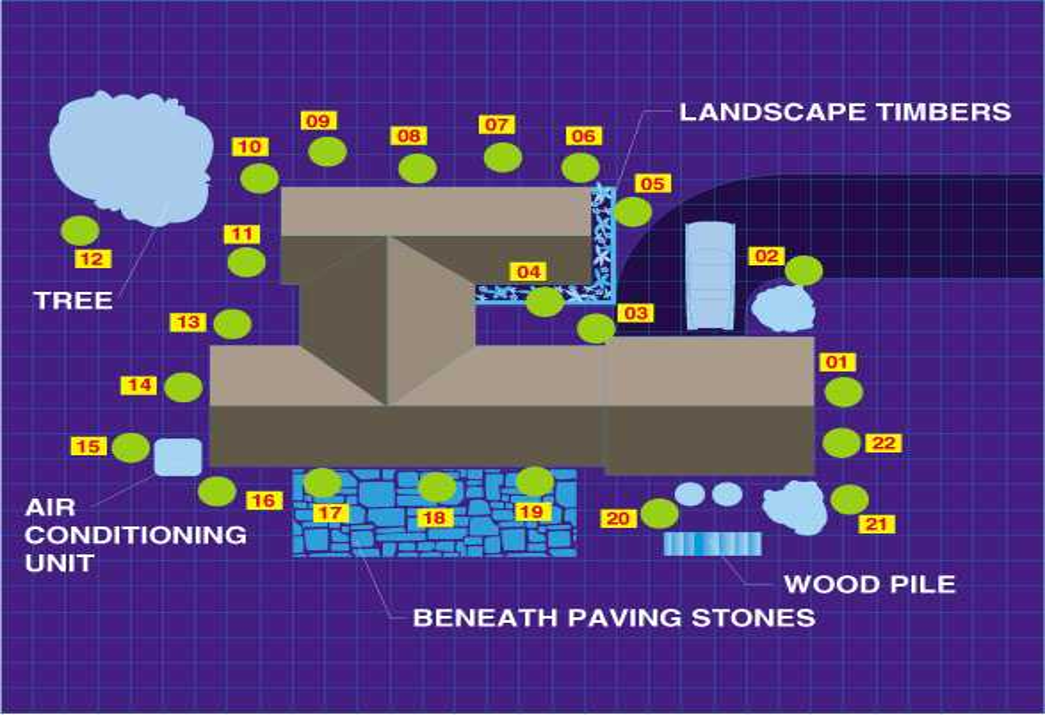
- Lay stations 6-10 feet apart, preferably 2-4 feet away from the foundation of the building
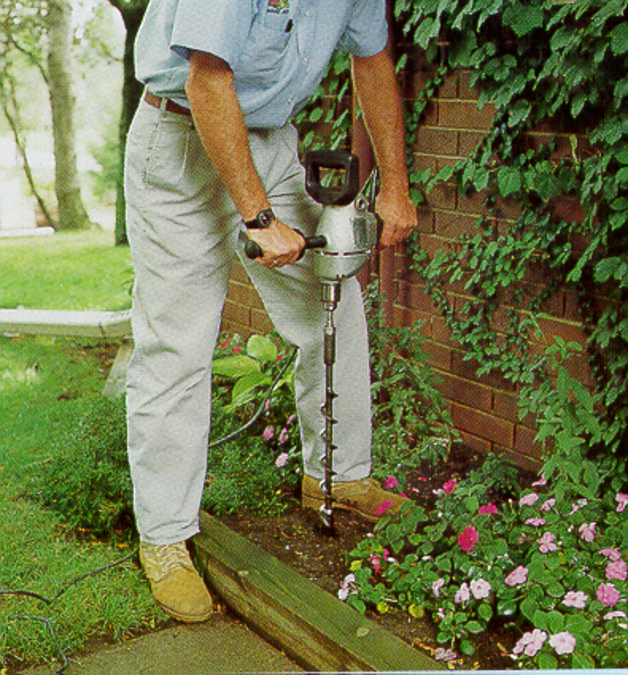
- Drill a 12-14 inch hole into the soil with the augar
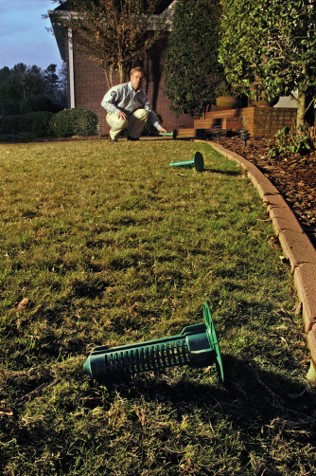
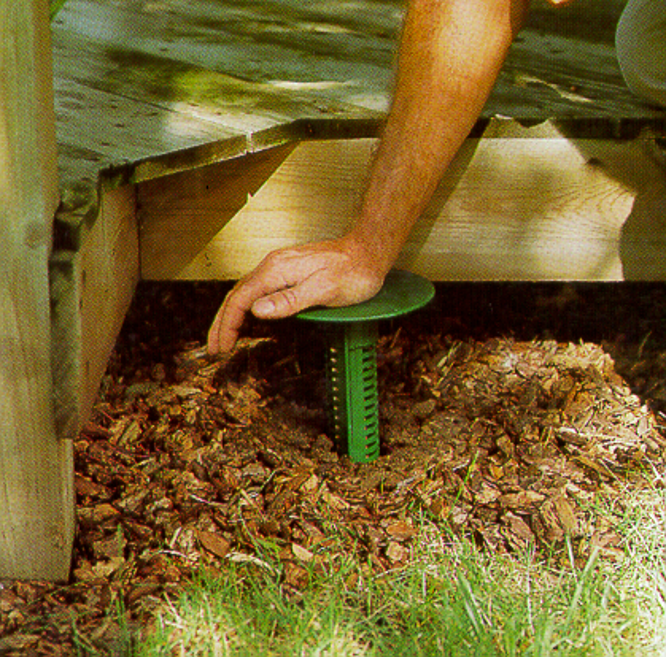
- Place Sentricon station into the hole until the station sits flush with the ground
- Mark on drawing of map where each station was placed. Write total amount of stations and total linear feet on the margins of the drawing
- Do spot treatment with Termidor HE if necessary. Take pictures of the area where there is live termite activity and or damage
- In PP, enter total number of stations installed on item line
- In PP, enter chemical and number of stations
- In PP, notate how many stations where installed, if spot treatment was completed and if pictures were loaded in PP
- email everything to office manager- Kristi Williams including pictures
- Clock out of PP
Sentricon Renewal
- Arrive at home and park on street
- Clock in PP
- Greet client and tell them your name, the company you are representing and that you are there to do a termite inspection
- Go into PP, under activities choose Sentricon icon
- Locate 1st station using the RFID scanner
- Scanner will blink white color when station is located
- Take termite pliers and remove top cap
- Using termite pliers extract bait from station
- Inspect bait to see if any activity has been in station
- Replace bait if needed, place back in station, secure cap to top of station
- Record results in PP after each station
- Repeat steps 5-11 until finished
- Give results to client
- Collect payment if necessary
Wood Destroying Inspect Reports
- Arrive at home and park on street
- Clock in PP
- Greet client and tell them your name, the company you are representing and that you are there to do a WDI inspection
- Install booties
- Inform client areas of the house you will be inspecting and approx. how long it will take you to inspect.
- Inform client that once you are finished you will go over the findings with them
- Start in the basement and inspect all areas conducive to termites, box sills, all wooden members of the structure. If there is a crawl space you must go inside and inspect it
- Begin inspect the 1st & 2nd floors and inside garage
- Inspect outside perimeter of structure
- Take pictures of any suspected areas of concern or damage
- Discuss findings with the client
- Complete PP
- Clock out PP
Sentricon Baiting System

Recruit® HD Bait Device
pre-loaded into every Sentricon® station

Contains noviflumuron
The 150-gram bait device is enough to eliminate the typical termite colony
Step 1:
Lay stations every 10 feet apart and 2-4 feet away from the foundation. Clock into PP
Step 2:
Install stations 10 feet apart and 2-4 feet away from foundation Drill a 12-14” hole into the soil with the gas powered drill auger
Step 3:
Gently push the station into the soil flush with ground level
ADMIN ONLY – Pre Installation
Step 1. Enter location in PP
Step 2. Click on “New Service Setup”
Step 3. Enter Service Type “Sentricon Check” EVERY time. (this is to set up the renewal each year.
- Enter Address in description line that is to be serviced annually
- Enter Amount of renewal price
- Click on INITIAL SERVICE
1.Enter Service Date
2.Frequency is Annual
3.Enter time and duration of install
- initial service is Sentricon New
5.Enter price & Tech that completed
- Schedule is Annual in the month installed
- Scroll down to Sentricon setup box
1.Type in linear feet from contract
2.elect install date
- Select product type – always active
4.Click add
ADMIN ONLY – Post Installation
Step 1: Click on order that was generated and post to a new batch
- Edit with address of install
- Release batch
- Email invoice to customer
Step 2: Entering number of Devices
- Once invoice has been posted, click on the White Sentricon Service Setup
- Scroll down and click on “Devices” which is shaded
- Click multiple devices
- Select device type AA
- Enter number of stations installed
- Click save
Step 3: Once installer sends office field notes- this is what you do next
Step 4: Print all documents
Step 5: Add to master green folder
Step 6: Load documents into PP
- save the contract desktop
- go to location in PP
- click on documents
- add document
- upload file from desktop
- name the file in PP
- save
Step 7: file master folder
Step 8: file by year & month
Step 9: add name, address, renewal date to renewal spreadsheet